






新闻中心 
PaddleSeg代码解读-损失函数、评估预测模块解读
 2025-08-01
 浏览次数:次
 返回列表
返回列表本文解读PaddleSeg中损失函数、评估模型及预测的代码。损失函数以交叉熵为例,讲解其处理维度、计算损失等代码;评估模块解析val.py参数、流程及指标计算;预测部分说明predict.py参数与预测过程,还涉及多尺度翻转等增强方式的代码实现。
☞☞☞AI 智能聊天, 问答助手, AI 智能搜索, 免费无限量使用 DeepSeek R1 模型☜☜☜

PaddleSeg代码解读-损失函数、评估预测模块解读
本篇文章是PaddleSeg代码解读的第三篇,主要解读以下内容:
1.损失函数代码解读:这里主要讲解常用的损失函数的代码与算法。
2.评估模型代码解读:这里讲解评估模型性能的代码与评估方法。
3.预测代码解读: 这里解读使用模型生成预测结果的方法。
1.损失函数代码解读
PaddleSeg套件支持多种损失函数,Cross Entroy Loss(交叉熵)是一种很常用的损失函数,在图像分类中基本都会用到。一般在图像分类中,神经网络最终输出节点数目与类别数一致,形状为[batch_size, num_classes],样本标签直接使用类别的序号表示,形状为[batch_size, 1]。在paddle中计算交叉熵的函数为softmax_with_cross_entropy,一般比较常用的两个参数为logits和label,可以直接使用logits和代表类别序号的label进行计算。举个例子
import paddle.fluid as fluid#这里会自动组装成batch,实际data的shape为[batch_size, 128],label的shape为[batch_size, 1]#softmax_with_cross_entropy接收的两个参数的维度一致,只是在最后一个维度上形状不同,label在最后#一个维度上的长度为1,代表的就是类别的编号,一般从0开始计数。data = fluid.layers.data(name='data', shape=[128], dtype='float32')
label = fluid.layers.data(name='label', shape=[1], dtype='int64')
fc = fluid.layers.fc(input=data, size=100)
out = fluid.layers.softmax_with_cross_entropy(logits=fc, label=label)
这里面softmax_with_cross_entropy首先会对logits进行softmax计算,公式如下:
softmax[i,j]=∑j(exp(x[i,j])exp(x[i,j])
然后再计算交叉熵,计算公式如下:
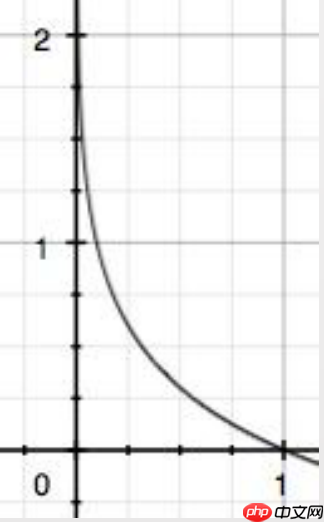
output[i1,i2,...,ik]=−log(input[i1,i2,...,ik,j]),label[i1,i2,...,ik]=j,j!=ignore_index 计算交叉熵的公式简单解释一下,就是将label转换为one hot形式,label向量中为1对应位置的logit值去计算-log值,如果logit的值越接近1,则损失值越小。如下图所示:
PaddleSeg中的交叉熵函数定义在paddleseg/models/losses/cross_entroy_loss.py函数中,下面我们来解析一下代码。
class CrossEntropyLoss(nn.Layer):

    def __init__(self, ignore_index=255):
        super(CrossEntropyLoss, self).__init__()        #保存需要忽略的类别序号
        self.ignore_index = ignore_index
        self.EPS = 1e-5

    def forward(self, logit, label):
        #比较label和logit的维度是否一致,一般传入label维度可能会比logit少1,
        #soft_with_cross_entropy的参数要求维度数量一致,所以这里把label扩展一个维度
        if len(label.shape) != len(logit.shape):
            label = paddle.unsqueeze(label, 1)        #对logit和label进行转置,将通道转置到最后一个维度,原来的形状为[batch_size, channel, height, width]
        #转置后形状为[batch_size, height, width, channel]
        #这时logit的channel的维度长度与类别数目一致,label的channel维度为长度为1,保存的是类别序号。
        logit = paddle.transpose(logit, [0, 2, 3, 1])
        label = paddle.transpose(label, [0, 2, 3, 1])        #计算交叉熵
        loss = F.softmax_with_cross_entropy(
            logit, label, ignore_index=self.ignore_index, axis=-1)        #统计有效的像素的数量,这里执行后类型为boolean
        mask = label != self.ignore_index        #boolean无法与float32运算,所以这里需要进行类型转换。
        mask = paddle.cast(mask, 'float32')        #统计需要计算loss的像素的数量,如果有的label是需要忽略的,那么在mask对应的位置则为0。
        loss = loss * mask        #计算整幅图像的损失值。如果图像中有忽略的部分,用损失值除以有效部分的占比,可以估算出整幅图像的损失值,
        #这样保证了有忽略部分的图像和没有忽略的图像损失计算的都是整幅图像的损失值。
        *g_loss = paddle.mean(loss) / (paddle.mean(mask) + self.EPS)

        label.stop_gradient = True
        mask.stop_gradient = True
        return *g_loss
以上就是损失函数部分的解读。
2.评估代码解读
当保存完模型后,我们可以通过PaddleSeg提供的脚本对模型进行评估
python val.py \
       --config configs/quick_start/bisenet_optic_disc_512x512_1k.yml \
       --model_path output/iter_1000/model.pdparams
如果想进行多尺度翻转评估可通过传入--aug_eval进行开启,然后通过--scales传入尺度信息, --flip_horizontal开启水平翻转, flip_vertical开启垂直翻转。使用示例如下:
python val.py \       --config configs/quick_start/bisenet_optic_disc_512x512_1k.yml \
       --model_path output/iter_1000/model.pdparams \
       --aug_eval \
       --scales 0.75 1.0 1.25 \
       --flip_horizontal
如果想进行滑窗评估可通过传入--is_slide进行开启, 通过--crop_size传入窗口大小, --stride传入步长。使用示例如下:
python val.py \       --config configs/quick_start/bisenet_optic_disc_512x512_1k.yml \
       --model_path output/iter_1000/model.pdparams \
       --is_slide \
       --crop_size 256 256 \
       --stride 128 128
首先可以通过下图了解一下评估程序的工作流程。
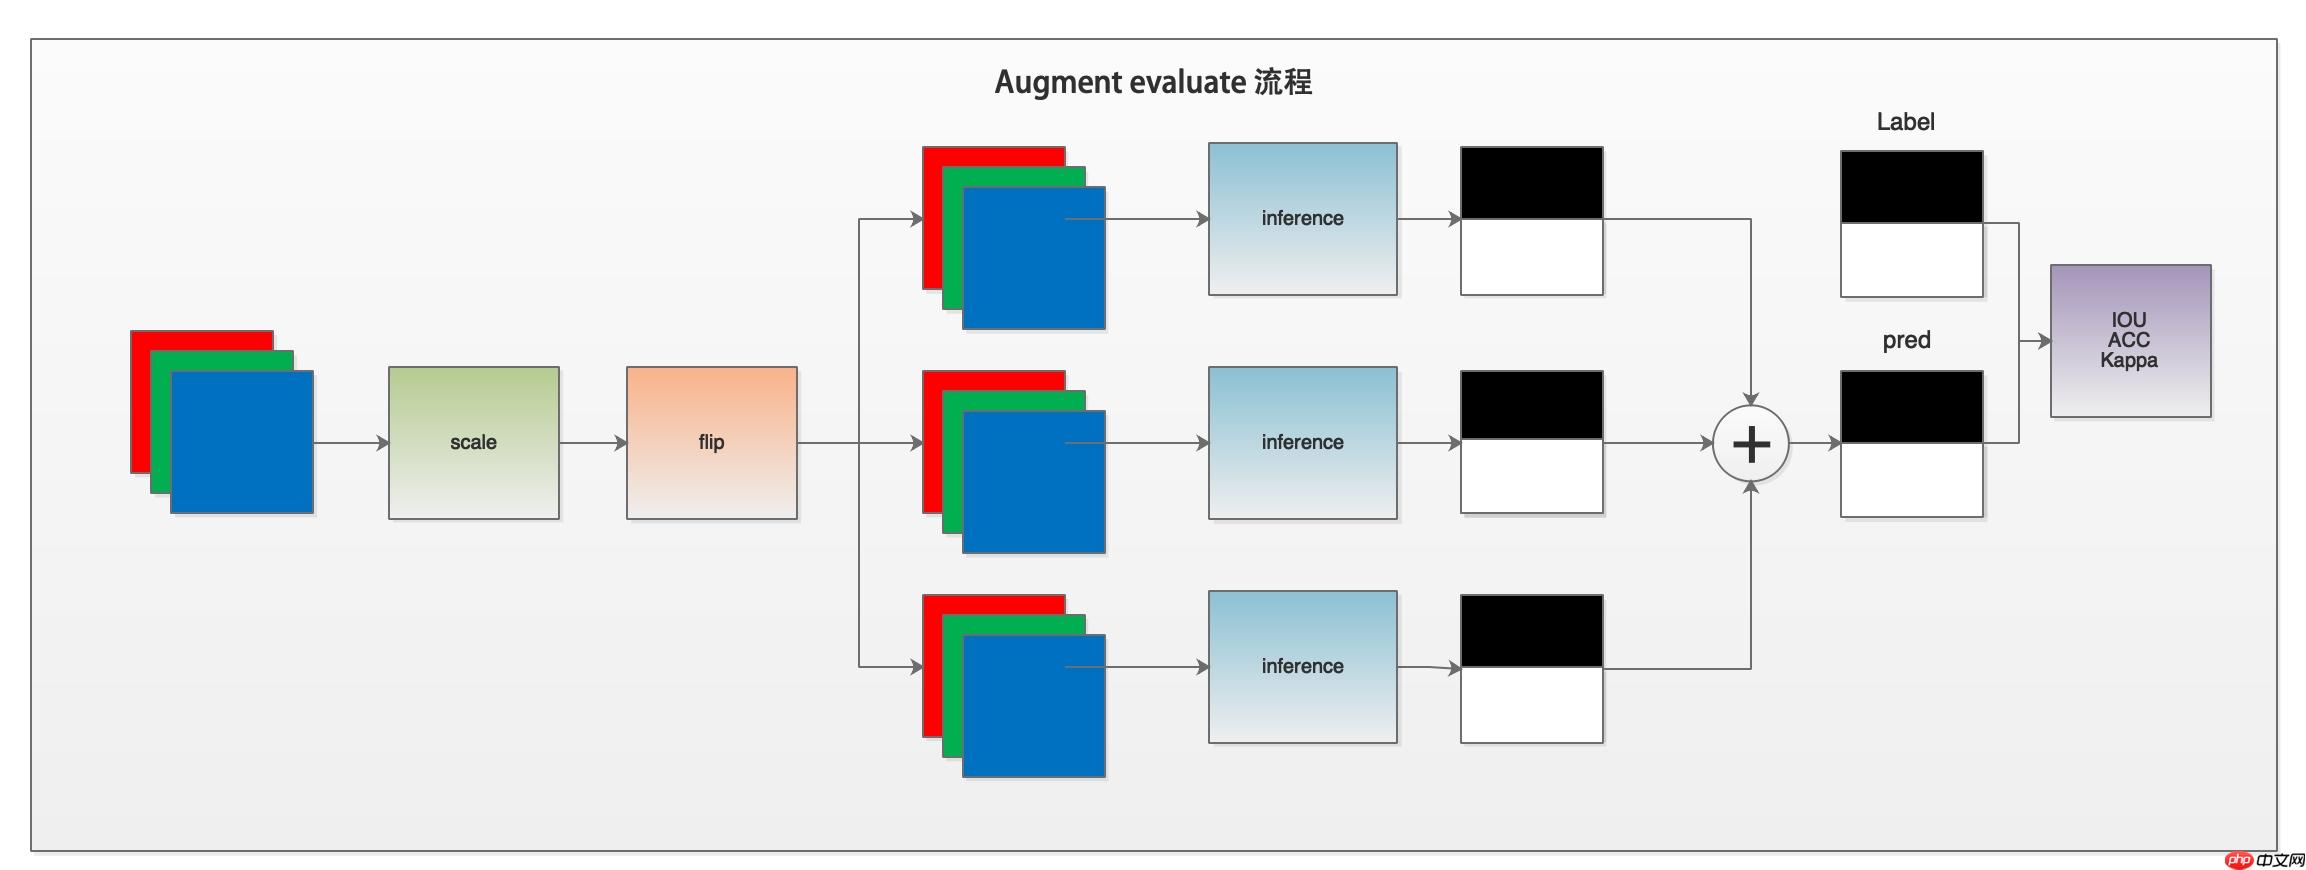
下面我们解读一下val.py的代码。
if __name__ == '__main__':	#解析传入参数
    args = parse_args()    #执行主体函数
    main(args)
我们通过解读parse_args函数来了解一下val.py脚本支持哪些输入参数。
def parse_args():
    parser = argparse.ArgumentParser(description='Model evaluation')

    # params of evaluate
    # 配置文件路径
    parser.add_argument(        "--config", dest="cfg", help="The config file.", default=None, type=str)
    # 训练好的模型权重路径
    parser.add_argument(        '--model_path',        dest='model_path',        help='The path of model for evaluation',        type=str,        default=None)
    # 数据读取器的进程
    parser.add_argument(        '--num_workers',        dest='num_workers',        help='Num workers for data loader',        type=int,        default=0)

    #是否开启多尺度翻转评估
    # augment for evaluation
    parser.add_argument(        '--aug_eval',        dest='aug_eval',        help='Whether to use mulit-scales and flip augment for evaluation',        action='store_true')
    # 指定缩放系数,1.0为保持尺寸不变,可以指定多个系数,用空格隔开。
    parser.add_argument(        '--scales',        dest='scales',        nargs='+',        help='Scales for augment',        type=float,        default=1.0)
    # 开启图片水平翻转
    parser.add_argument(        '--flip_horizontal',        dest='flip_horizontal',        help='Whether to use flip horizontally augment',        action='store_true')
    #开启图片垂直翻转
    parser.add_argument(        '--flip_vertical',        dest='flip_vertical',        help='Whether to use flip vertically augment',        action='store_true')

    #滑动窗口参数配置,是否开启滑动窗口
    # sliding window evaluation
    parser.add_argument(        '--is_slide',        dest='is_slide',        help='Whether to evaluate by sliding window',        action='store_true')
    #滑动窗口尺寸
    parser.add_argument(        '--crop_size',        dest='crop_size',        nargs=2,
        help=        'The crop size of sliding window, the first is width and the second is height.',        type=int,        default=None)
    # 滑动窗口移动的步长,需要指定水平方向和垂直方向两个参数。
    parser.add_argument(        '--stride',        dest='stride',        nargs=2,
        help=        'The stride of sliding window, the first is width and the second is height.',        type=int,        default=None)

    return parser.parse_args()
以上是输入参数的解析。在main函数中,主要使用core/val.py模块中的evaluate函数对模型进行评估。
首先看一下evaluate函数的代码概要。
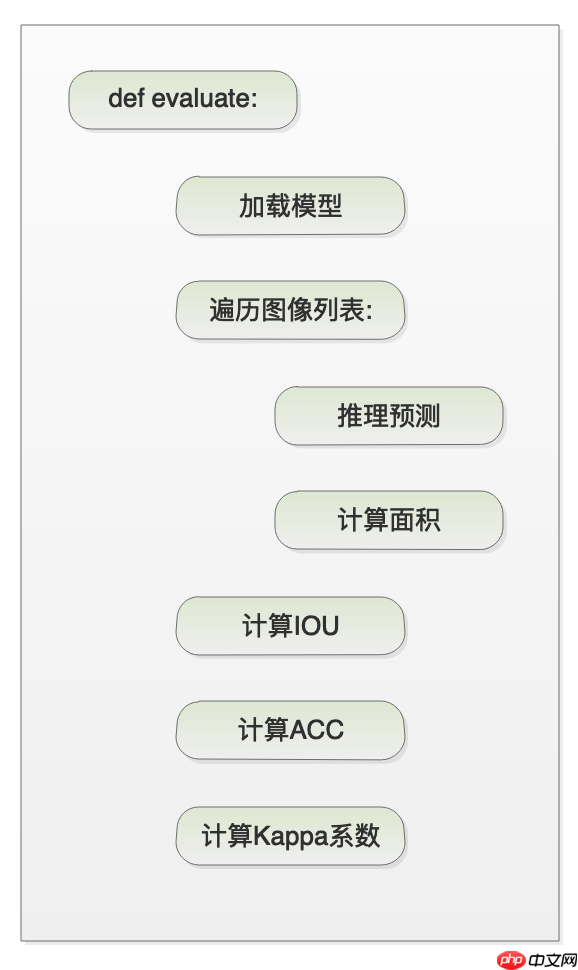
然后在对evaluate函数的代码进行解读。
def evaluate(model,
             eval_dataset,             aug_eval=False,
             scales=1.0,
             flip_horizontal=True,
             flip_vertical=False,
             is_slide=False,
             stride=None,
             crop_size=None,
             num_workers=0):
    #设置模型为评估模式
    model.eval()    #为了兼容多卡训练,这里需要获取显卡数量。
    nranks = paddle.distributed.ParallelEnv().nranks    #在分布式训练中,每个显卡都会执行本程序,所以需要在程序里获取本显卡的序列号。
    local_rank = paddle.distributed.ParallelEnv().local_rank    #如果是多卡训练,则需要初始化多卡训练环境。
    if nranks > 1:        # Initialize parallel environment if not done.
        if not paddle.distributed.parallel.parallel_helper._is_parallel_ctx_initialized(
        ):
            paddle.distributed.init_parallel_env()    #创建一个批量采样器,这里指定数据集,通过批量采样器组成一个batch。
    #评估时指定batch size为1,不需要打乱数据,不能丢弃末尾的数据。
    batch_sampler = paddle.io.DistributedBatchSampler(
        eval_dataset, batch_size=1, shuffle=False, drop_last=False)
    #通过数据集参数和批量采样器等参数构建一个数据读取器。可以通过num_works设置多进程,这里的多进程通过共享内存通信,
    #如果共享内存过小可能会报错,如果报错可以尝将num_workers设置为0,则不开启多进程。
    loader = paddle.io.DataLoader(
        eval_dataset,        batch_sampler=batch_sampler,
        num_workers=num_workers,
        return_list=True,
    )    #迭代次数,为评估数据的数量
    total_iters = len(loader)    #初始化评估指标
    intersect_area_all = 0
    pred_area_all = 0
    label_area_all = 0

    logger.info("Start evaluating (total_samples={}, total_iters={})...".format(
        len(eval_dataset), total_iters))    #定义一个进度条
    progbar_val = progbar.Progbar(target=total_iters, verbose=1)
    timer = Timer()    with paddle.no_grad():        #遍历数据集中的数据
        for iter, (im, label) in enumerate(loader):            reader_cost = timer.elapsed_time()            label = label.astype('int64')            ori_shape = label.shape[-2:]            #是否开启多尺度翻转评估
            if aug_eval:            	#对图片进行多尺度翻转推理
                pred = infer.aug_inference(
                    model,
                    im,                    ori_shape=ori_shape,
                    transforms=eval_dataset.transforms.transforms,
                    scales=scales,
                    flip_horizontal=flip_horizontal,
                    flip_vertical=flip_vertical,
                    is_slide=is_slide,
                    stride=stride,
                    crop_size=crop_size)
            else:                #对图片进行常规的推理操作。
                pred = infer.inference(
                    model,
                    im,                    ori_shape=ori_shape,
                    transforms=eval_dataset.transforms.transforms,
                    is_slide=is_slide,
                    stride=stride,
                    crop_size=crop_size)
            #使用推理结果计算预测结果每个类别的区域面积、标签中每个类别的区域面积和预测结果和标签每个类别交集的面积。
            intersect_area, pred_area, label_area = metrics.calculate_area(
                pred,
                label,
                eval_dataset.num_classes,                ignore_index=eval_dataset.ignore_index)

            #如果是多卡评估,则需要从其他显卡收集数据
            # Gather from all ranks
            if nranks > 1:                intersect_area_list = []                pred_area_list = []                label_area_list = []
                paddle.distributed.all_gather(intersect_area_list, intersect_area)
                paddle.distributed.all_gather(pred_area_list, pred_area)
                paddle.distributed.all_gather(label_area_list, label_area)				# 多卡评估有可能会重复评估一部分样本,所以需要去除掉
                # Some image has been evaluated and should be eliminated in last iter
                if (iter + 1) * nranks > len(eval_dataset):                    valid = len(eval_dataset) - iter * nranks                    intersect_area_list = intersect_area_list[:valid]                    pred_area_list = pred_area_list[:valid]                    label_area_list = label_area_list[:valid]				#将之前计算的各个面积数值进行累加
                for i in range(len(intersect_area_list)):                    intersect_area_all = intersect_area_all + intersect_area_list[i]                    pred_area_all = pred_area_all + pred_area_list[i]                    label_area_all = label_area_all + label_area_list[i]
            else:                #单卡评估直接对面积数值进行累加
                intersect_area_all = intersect_area_all + intersect_area                pred_area_all = pred_area_all + pred_area                label_area_all = label_area_all + label_area            batch_cost = timer.elapsed_time()
            timer.restart()            #更新进度条
            if local_rank == 0:
                progbar_val.update(iter + 1, [('batch_cost', batch_cost),
                                              ('reader cost', reader_cost)])    #计算mean_iou。
    class_iou, miou = metrics.mean_iou(intersect_area_all, pred_area_all,
                                       label_area_all)    # 计算各个类别的精确率和平均精确率,这里函数名称是accuracy,但计算的是精确率。
    class_acc, acc = metrics.accuracy(intersect_area_all, pred_area_all)    # 计算kappa系数,验证一致性。
    kappa = metrics.kappa(intersect_area_all, pred_area_all, label_area_all)    # 输出评估指标
    logger.info("[EVAL] #Images={} mIoU={:.4f} Acc={:.4f} Kappa={:.4f} ".format(
        len(eval_dataset), miou, acc, kappa))
    logger.info("[EVAL] Class IoU: \n" + str(np.round(class_iou, 4)))
    logger.info("[EVAL] Class Acc: \n" + str(np.round(class_acc, 4)))
    return miou, acc
首先评估程序通过calculate_area函数得到三种面积,分别是:
- pred_area:包含每个类别预测结果的面积
- label_area:包含每个类别样本标签的面积
- intersect_area:包含每个类别pred_area和intersect_area交集的面积。
使用上面三种数据可以计算三种评估指标:交并比(IOU),精确率(Precision)和kappa系数。下面分别介绍一下这三个指标的计算方法以及意义。
- IOU:可以计算每个类别的交并比,公式如下:
IOU=pred_area[i]+label_area[i]−intersect_area[i]intersect_area[i]
- MIOU:平均IOU,即每个类别的IOU的平均值,公式如下:
MIOU=NIOU[1]+IOU[2]+...+IOU[N]
从公式可以了解到IOU和MIOU的数值越接近1说明效果越好。这是衡量一个模型性能的重要指标。
- Precision:精确率,在图像分割中使用以下公式可以计算每个类别的精确率:
Precision=pred_area[i]intersect_area[i]
- Kappa系数:Kappa系数用于一致性检验,也可以用于衡量分类精度。计算公式如下:
kappa=1−PEPO−PE
 Motiff妙多
Motiff妙多是一款AI驱动的界面设计工具,定位为“AI时代设计工具”
 334
查看详情
334
查看详情

PO:每一类正确分类的样本数量之和除以总样本数,也就是准确率(accuracy)。
PE:假设每一类的真实样本个数分别保存在label_area列表里,而预测出来的每一类的样本个数分别保存在label_area列表里,总样本个数为label_area中值的和,则有:
PO=SUM(label_area)SUM(intersect_area)
PE=SUM(label_area)∗SUM(label_area)SUM(pred_area∗label_area)
在上述代码中,根据输入参数不同,则调用不同的推理函数,下面介绍一下推理函数。
def inference(model,
              im,              ori_shape=None,              transforms=None,              is_slide=False,              stride=None,              crop_size=None):
    #如果没开启滑动窗口    if not is_slide:
        #预测结果
        logits = model(im)        if not isinstance(logits, collections.abc.Sequence):
            raise TypeError(                "The type of logits must be one of collections.abc.Sequence, e.g. list, tuple. But received {}"
                .format(type(logits)))
        logit = logits[0]    else:
        #开启滑动窗口,预测结果
        logit = slide_inference(model, im, crop_size=crop_size, stride=stride)    if ori_shape is not None:
        #通过argmax函数,获取每个像素点中最大的分类序号。
        pred = paddle.argmax(logit, axis=1, keepdim=True, dtype='int32')
        pred = reverse_transform(pred, ori_shape, transforms)
        return pred    else:
        return logit
def slide_inference(model, im, crop_size, stride):
#获取图像的宽度和高度
h_im, w_im = im.shape[-2:] #获取窗口的宽度和高度
w_crop, h_crop = crop_size #获取水平和垂直方向,窗口移动的步长
w_stride, h_stride = stride # calculate the crop nums
#计算出水平和垂直需要移动多少步
rows = np.int(np.ceil(1.0 * (h_im - h_crop) / h_stride)) + 1
cols = np.int(np.ceil(1.0 * (w_im - w_crop) / w_stride)) + 1
# TODO 'Tensor' object does not support item assignment. If support, use tensor to calculation.
final_logit = None
#定义一个计数器,保存预测结果叠加的次数。
count = np.zeros([1, 1, h_im, w_im]) #循环开始,移动窗口
for r in range(rows): for c in range(cols): #计算窗口的位置和尺寸
h1 = r * h_stride
w1 = c * w_stride
h2 = min(h1 + h_crop, h_im)
w2 = min(w1 + w_crop, w_im)
h1 = max(h2 - h_crop, 0)
w1 = max(w2 - w_crop, 0) #裁剪图像
im_crop = im[:, :, h1:h2, w1:w2] #对图像进行预测
logits = model(im_crop) if not isinstance(logits, collections.abc.Sequence): raise TypeError( "The type of logits must be one of collections.abc.Sequence, e.g. list, tuple. But received {}"
.format(type(logits)))
logit = logits[0].numpy() #创建一个输出的logit
if final_logit is None:
final_logit = np.zeros([1, logit.shape[1], h_im, w_im]) #将输出结果与之前计算的结果相加,保存到final_logit中
final_logit[:, :, h1:h2, w1:w2] += logit[:, :, :h2 - h1, :w2 - w1] #计数
count[:, :, h1:h2, w1:w2] += 1
if np.sum(count == 0) != 0: raise RuntimeError( 'There are pixel not predicted. It is possible that stride is greater than crop_size'
) #由于滑动窗口,会多次叠加final_logit,计算平均值。
final_logit = final_logit / count #转换ndarray为张量
final_logit = paddle.to_tensor(final_logit) return final_logit下面看一下aug_inference函数的代码概要,
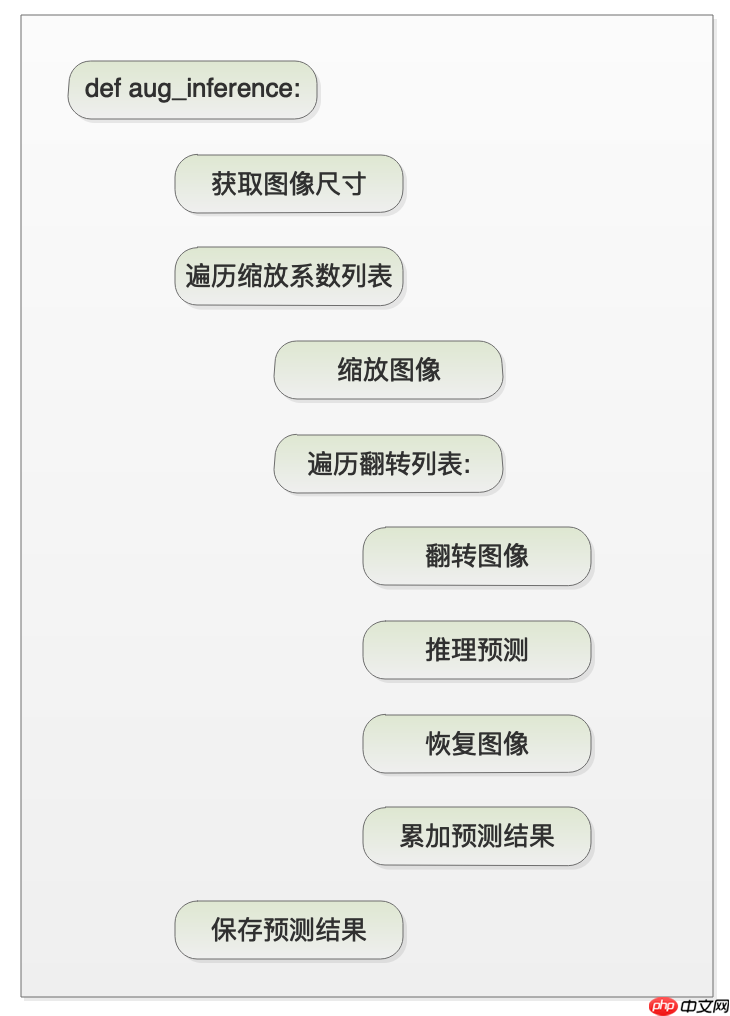
然后看一下aug_inference的代码解读。
def aug_inference(model,
                  im,
                  ori_shape,
                  transforms,                  scales=1.0,
                  flip_horizontal=False,
                  flip_vertical=False,
                  is_slide=False,
                  stride=None,
                  crop_size=None):

    if isinstance(scales, float):        scales = [scales]
    elif not isinstance(scales, (tuple, list)):
        raise TypeError(
            '`scales` expects float/tuple/list type, but received {}'.format(
                type(scales)))    final_logit = 0
    h_input, w_input = im.shape[-2], im.shape[-1]    #通过水平和垂直翻转的参数,得到翻转列表
    flip_comb = flip_combination(flip_horizontal, flip_vertical)    #遍历所有输入的缩放系数
    for scale in scales:        #通过系数计算图像的高和宽
        h = int(h_input * scale + 0.5)        w = int(w_input * scale + 0.5)        #对图像进行缩放
        im = F.interpolate(im, (h, w), mode='bilinear')
        #遍历翻转列表
        for flip in flip_comb:        	#对图像进行翻转
            im_flip = tensor_flip(im, flip)            #运行常规预测,得到结果logit
            logit = inference(
                model,
                im_flip,                is_slide=is_slide,
                crop_size=crop_size,
                stride=stride)
            #因为图像经过翻转,所以将logit的结果恢复
            logit = tensor_flip(logit, flip)            #将logit进行缩放,恢复到原有输入图像的尺寸
            logit = F.interpolate(logit, (h_input, w_input), mode='bilinear')
			#将logit进行softmax运算
            logit = F.softmax(logit, axis=1)
            #将增强预测的结果进行叠加
            final_logit = final_logit + logit    #通过argmax函数,获取每个像素点中最大的分类序号。
    pred = paddle.argmax(final_logit, axis=1, keepdim=True, dtype='int32')
    #如果输入图像进行了transforms预处理操作,这里需要对输出结果进行还原,保持与输入图像一致。
    pred = reverse_transform(pred, ori_shape, transforms)
    return pred
3.预测代码解读
训练完成模型之后,可以对图片进行预测,还可以实现模型结果可视化,查看分割效果。
运行命令如下:
python predict.py \
       --config configs/quick_start/bisenet_optic_disc_512x512_1k.yml \
       --model_path output/iter_1000/model.pdparams \
       --image_path data/optic_disc_seg/JPEGImages/H0003.jpg \
       --s*e_dir output/result
首先解释一下上面命令的参数含义,
--config指定配置文件,其中包含了模型的名称。
--model_path指定模型路径
--image_path指定输入预测的图片路径
--s*e_dir指定了输出预测结果保存的路径。
还可以通过以下命令进行多尺度翻转预测。
--aug_pred是否开启增强预测
--scales缩放系数,默认为1.0
--flip_horizontal是否开启水平翻转
--flip_vertical是否开启垂直翻转
多尺度翻转预测是在普通预测的基础上,对输入图片进行多尺度缩放、水平垂直方向翻转等操作,得出多个预测结果,然后将多个预测结果相加作为最后的输出结果。可以通过下图了解一下预测程序的工作流程。
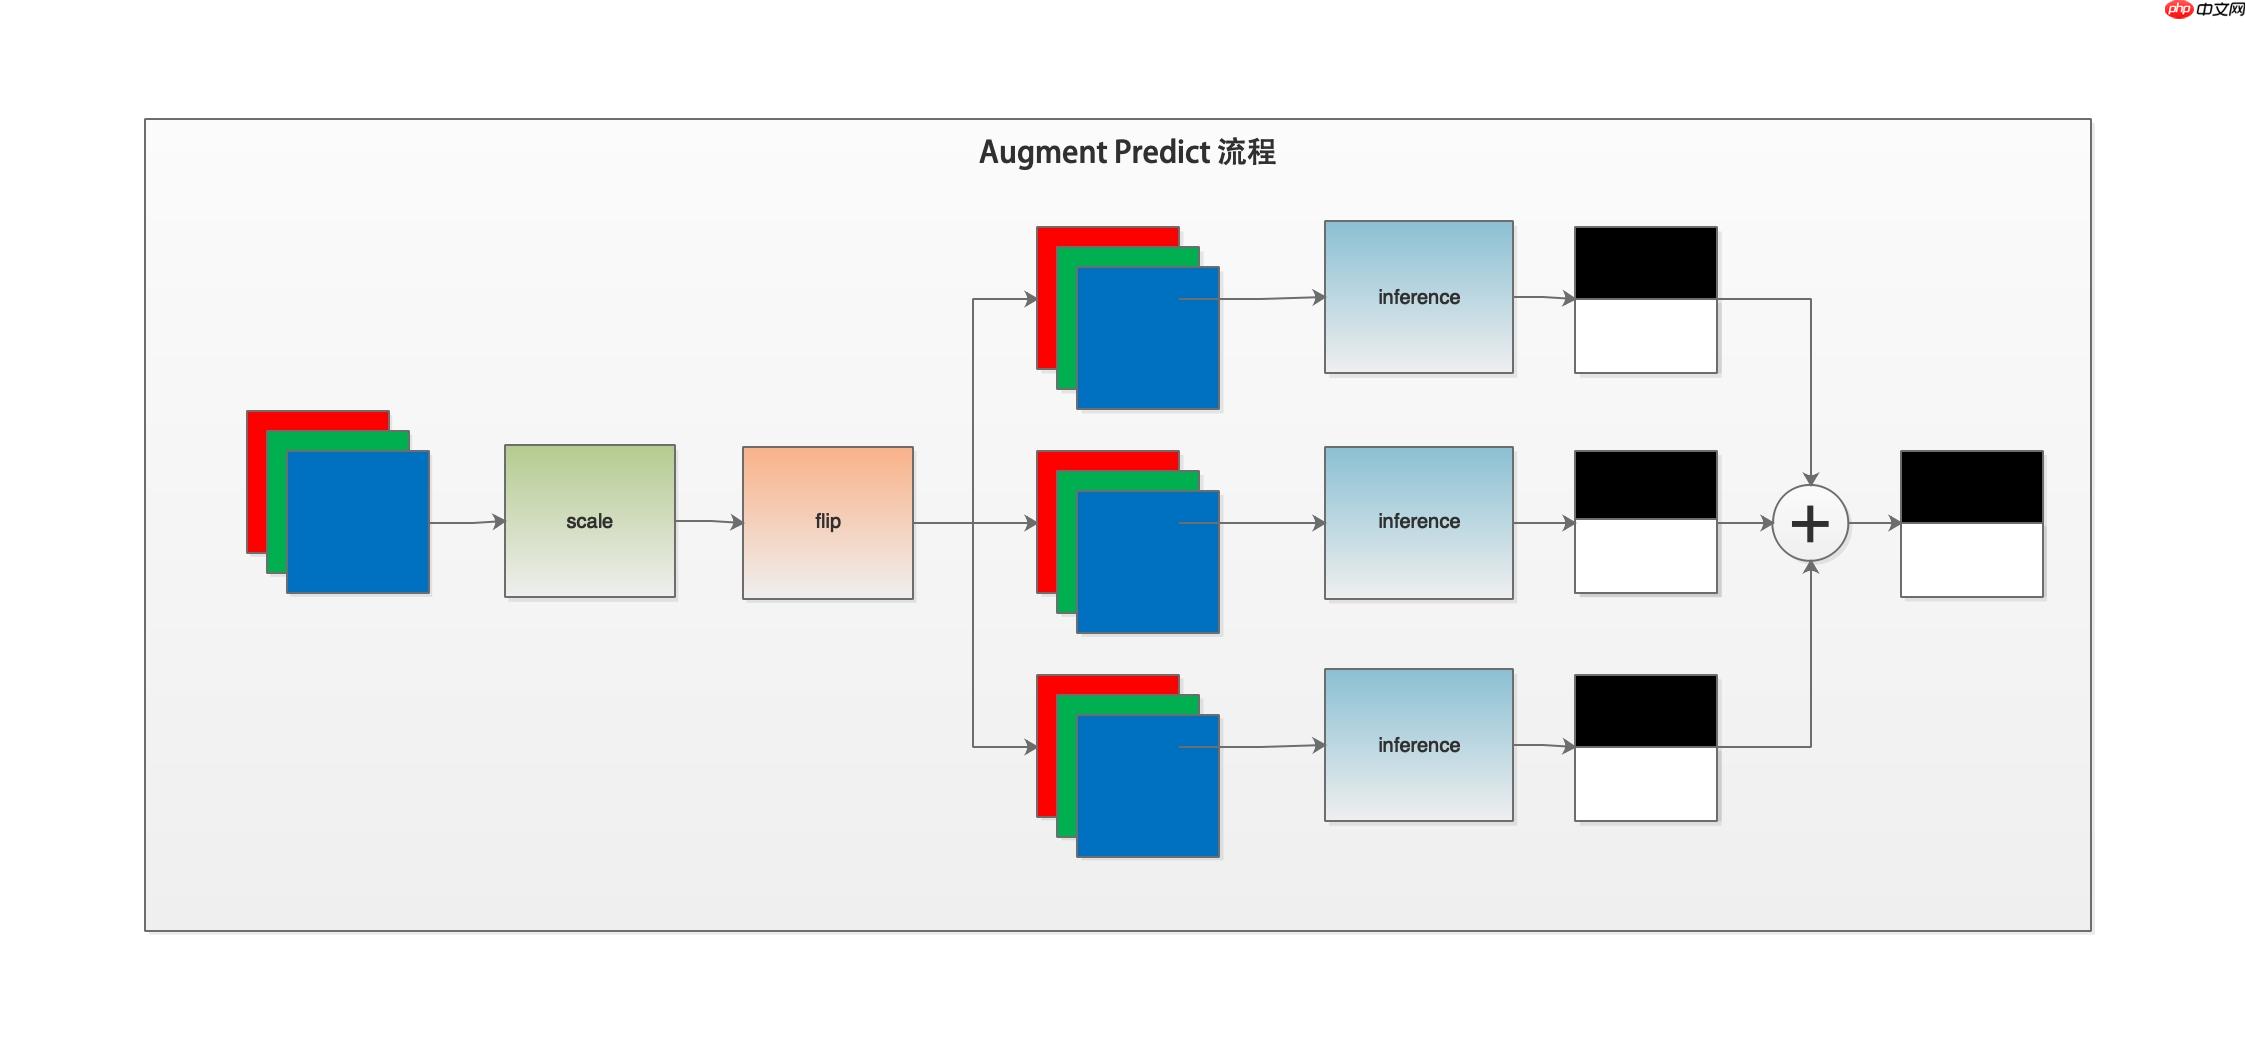
下面我们解读一下predict.py的代码。
if __name__ == '__main__':	#解析传入参数
    args = parse_args()    #执行主体函数
    main(args)
我们通过解读parse_args函数来了解一下predict.py脚本支持的输入参数与val.py基本一致。
def parse_args():
parser = argparse.ArgumentParser(description='Model prediction')
# params of prediction
# 配置文件路径
parser.add_argument( "--config", dest="cfg", help="The config file.", default=None, type=str)
# 训练好的模型权重路径
parser.add_argument( '--model_path', dest='model_path', help='The path of model for prediction', type=str, default=None)
# 输入的预测图片路径
parser.add_argument( '--image_path', dest='image_path',
help= 'The path of image, it can be a file or a directory including images', type=str, default=None)
#输出的保存预测结果路径
parser.add_argument( '--s*e_dir', dest='s*e_dir', help='The directory for s*ing the predicted results', type=str, default='./output/result')
# augment for prediction
#是否使用多尺度和翻转增强的方式预测。这种方法会带来精度的提升,推荐使用
parser.add_argument( '--aug_pred', dest='aug_pred', help='Whether to use mulit-scales and flip augment for prediction', action='store_true')
# 指定缩放系数,1.0为保持尺寸不变,可以指定多个系数,用空格隔开。
parser.add_argument( '--scales', dest='scales', nargs='+', help='Scales for augment', type=float, default=1.0)
# 开启图片水平翻转
parser.add_argument( '--flip_horizontal', dest='flip_horizontal', help='Whether to use flip horizontally augment',  action='store_true')
#开启图片垂直翻转
parser.add_argument( '--flip_vertical', dest='flip_vertical', help='Whether to use flip vertically augment', action='store_true')
# sliding window prediction
#滑动窗口参数配置,是否开启滑动窗口
parser.add_argument( '--is_slide', dest='is_slide', help='Whether to prediction by sliding window', action='store_true')
# 滑动窗口尺寸
parser.add_argument( '--crop_size', dest='crop_size', nargs=2,
help= 'The crop size of sliding window, the first is width and the second is height.', type=int, default=None)
# 滑动窗口移动的步长,需要指定水平方向和垂直方向两个参数。
parser.add_argument( '--stride', dest='stride', nargs=2,
help= 'The stride of sliding window, the first is width and the second is height.', type=int, default=None)
return parser.parse_args()
action='store_true')
#开启图片垂直翻转
parser.add_argument( '--flip_vertical', dest='flip_vertical', help='Whether to use flip vertically augment', action='store_true')
# sliding window prediction
#滑动窗口参数配置,是否开启滑动窗口
parser.add_argument( '--is_slide', dest='is_slide', help='Whether to prediction by sliding window', action='store_true')
# 滑动窗口尺寸
parser.add_argument( '--crop_size', dest='crop_size', nargs=2,
help= 'The crop size of sliding window, the first is width and the second is height.', type=int, default=None)
# 滑动窗口移动的步长,需要指定水平方向和垂直方向两个参数。
parser.add_argument( '--stride', dest='stride', nargs=2,
help= 'The stride of sliding window, the first is width and the second is height.', type=int, default=None)
return parser.parse_args() action='store_true')
#开启图片垂直翻转
parser.add_argument( '--flip_vertical', dest='flip_vertical', help='Whether to use flip vertically augment', action='store_true')
# sliding window prediction
#滑动窗口参数配置,是否开启滑动窗口
parser.add_argument( '--is_slide', dest='is_slide', help='Whether to prediction by sliding window', action='store_true')
# 滑动窗口尺寸
parser.add_argument( '--crop_size', dest='crop_size', nargs=2,
help= 'The crop size of sliding window, the first is width and the second is height.', type=int, default=None)
# 滑动窗口移动的步长,需要指定水平方向和垂直方向两个参数。
parser.add_argument( '--stride', dest='stride', nargs=2,
help= 'The stride of sliding window, the first is width and the second is height.', type=int, default=None)
return parser.parse_args()
action='store_true')
#开启图片垂直翻转
parser.add_argument( '--flip_vertical', dest='flip_vertical', help='Whether to use flip vertically augment', action='store_true')
# sliding window prediction
#滑动窗口参数配置,是否开启滑动窗口
parser.add_argument( '--is_slide', dest='is_slide', help='Whether to prediction by sliding window', action='store_true')
# 滑动窗口尺寸
parser.add_argument( '--crop_size', dest='crop_size', nargs=2,
help= 'The crop size of sliding window, the first is width and the second is height.', type=int, default=None)
# 滑动窗口移动的步长,需要指定水平方向和垂直方向两个参数。
parser.add_argument( '--stride', dest='stride', nargs=2,
help= 'The stride of sliding window, the first is width and the second is height.', type=int, default=None)
return parser.parse_args()以上是输入参数的解析。在main函数中,主要使用core/predict.py模块中的predict函数对图片进行预测。
首先看一下predict函数的代码概要。
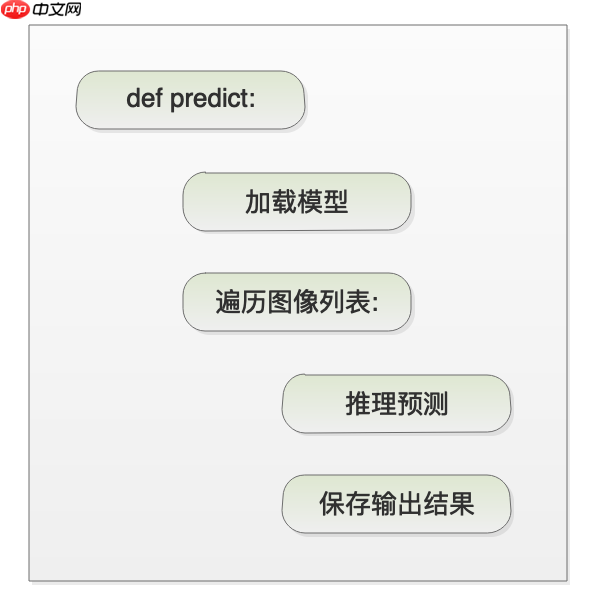
然后对predict函数进行代码解读。
def predict(model,
            model_path,
            transforms,
            image_list,            image_dir=None,            s*e_dir='output',            aug_pred=False,            scales=1.0,            flip_horizontal=True,            flip_vertical=False,            is_slide=False,            stride=None,            crop_size=None):
    #加载模型权重
    para_state_dict = paddle.load(model_path)
    model.set_dict(para_state_dict)
    #设置模型为评估模式
    model.eval()

    added_s*ed_dir = os.path.join(s*e_dir, 'added_prediction')
    pred_s*ed_dir = os.path.join(s*e_dir, 'pseudo_color_prediction')

    logger.info("Start to predict...")
    #设置进度条
    progbar_pred = progbar.Progbar(target=len(image_list), verbose=1)
    #遍历图片列表    for i, im_path in enumerate(image_list):
    	#读取图像
        im = cv2.imread(im_path)
        #获取图像宽高
        ori_shape = im.shape[:2]
        #对图像进行转换
        im, _ = transforms(im)
        #新增一个维度
        im = im[np.newaxis, ...]
        #将ndarray数据转换为张量
        im = paddle.to_tensor(im)
		#是否开启多尺度翻转预测        if aug_pred:
            #开启多尺度翻转预测,则对图片进行多尺度翻转预测
            pred = infer.aug_inference(
                model,
                im,                ori_shape=ori_shape,                transforms=transforms.transforms,                scales=scales,                flip_horizontal=flip_horizontal,                flip_vertical=flip_vertical,                is_slide=is_slide,                stride=stride,                crop_size=crop_size)        else:
            #如果没有开启多尺度翻转预测,则对图片进行常规的推理预测操作。
            pred = infer.inference(
                model,
                im,                ori_shape=ori_shape,                transforms=transforms.transforms,                is_slide=is_slide,                stride=stride,                crop_size=crop_size)
        #将返回数据去除多余的通道,并转为uint8类型,方便保存为图片
        pred = paddle.squeeze(pred)
        pred = pred.numpy().astype('uint8')

        #获取保存图片的名称
        # get the s*ed name        if image_dir is not None:
            im_file = im_path.replace(image_dir, '')        else:
            im_file = os.path.basename(im_path)        if im_file[0] == '/':
            im_file = im_file[1:]
		#保存结果
        added_image = utils.visualize.visualize(im_path, pred, weight=0.6)
        added_image_path = os.path.join(added_s*ed_dir, im_file)
        mkdir(added_image_path)
        cv2.imwrite(added_image_path, added_image)

		# 保存伪色彩预测结果
        # s*e pseudo color prediction
        pred_mask = utils.visualize.get_pseudo_color_map(pred)
        pred_s*ed_path = os.path.join(pred_s*ed_dir,
                                       im_file.rsplit(".")[0] + ".png")
        mkdir(pred_s*ed_path)
        pred_mask.s*e(pred_s*ed_path)

        # pred_im = utils.visualize(im_path, pred, weight=0.0)
        # pred_s*ed_path = os.path.join(pred_s*ed_dir, im_file)
        # mkdir(pred_s*ed_path)
        # cv2.imwrite(pred_s*ed_path, pred_im)
		#进度条进度加1
        progbar_pred.update(i + 1)
以上就是PaddleSeg代码解读-损失函数、评估预测模块解读的详细内容,更多请关注其它相关文章!
# 可以通过
# 游戏行业短视频推广营销
# 医美otc推广营销方案
# 烟台家装网站建设
# 智能家居推广与营销方案
# 浙江广电网站优化大全
# seo教程网手游推广
# 荔湾区高端网站建设推广
# 沛县品质网站推广优势
# 互联网营销怎么做推广员
# 普洱抖音关键词排名厂家
# 配置文件
# 进度条
# 的是
# 三种
# python
# 一言
# 看一下
# 遍历
# 多个
# 中文网
# type
# descript
# fig
# igs
# red
# cos
# ai
# git
相关栏目:
【
行业资讯67740 】
【
技术百科0 】
【
网络运营39195 】
相关推荐:
openwrt有什么用
固态硬盘质量如何
nosql数据库的应用场景有哪些
新固态硬盘如何装系统
苹果16有哪些自带配件
树莓派命令行如何新建文件
rxjs和typescript什么意思
市盈率为负值是什么意思
什么是泛域名解析
linux如何使用db2命令
如何去除计算器的命令
广东春运抢票怎么抢的
征信不好如何恢复信誉度 征信不好恢复信誉度的方法
如何winpe cmd命令
typescript怎么加号
苹果16配置参数有哪些
单身聊天app有哪些软件 2025最靠谱的单身交友软件推荐
win7怎么取消360显示的壁纸
折叠屏有哪些手机
db2命令中如何去到指定的副本
如何提高固态硬盘速度
typescript怎么设置滚动条
苹果16系统有哪些问题
win7旗舰版wifi怎么打开
学typescript要求什么
三星相机里power是什么意思
typescript怎么理解的
2025年国外最佳语音聊天软件排行榜
推特是什么软件国内可以使用吗
ssd固态硬盘如何选择
苹果16自带配件有哪些
固态硬盘如何外接
内在市盈率是什么意思
硬盘和固态硬盘如何区分
5r是多少钱
旧固态硬盘如何卖出
什么是typescript
typescript多久能学会
苹果16有哪些改装模式
win7怎么关闭360壁纸屏保
j*a对数组怎么使用
平仓是什么意思?
市盈率估值1stdv是什么意思
苹果16有哪些不同
cron表达式在线工具有哪些
win10如何开启命令行
如何选择启用固态硬盘
阿里云盘的会员怎么用
如何修改域名解析
j*a怎么清除数组
