






新闻中心 
【AI达人特训营】在智能交通场景中端到端加速PPYOLOE
 2025-08-01
 浏览次数:次
 返回列表
返回列表本项目针对城市自动驾驶中基于车载摄像头的交通灯小目标识别挑战,采用PaddleDetection套件的PPYOLOE M模型训练,在A100环境实现。使用特定数据集训练,涵盖红、黄、绿、未亮灯四类。通过TensorRT加速,将NMS封装进模型实现端到端加速,A100上FP16达330FPS,较官方数据提升显著,适用于PPYOLOE系列算法。
☞☞☞AI 智能聊天, 问答助手, AI 智能搜索, 免费无限量使用 DeepSeek R1 模型☜☜☜

1.项目背景
红绿灯识别对于在城市地区的全自动驾驶至关重要,基于车载摄像头的交通灯识别中,目标表现为小目标,问题有较大的挑战性。本项目对常见场景中的交通信号灯进行识别, 使用飞桨提供的目标检测套件PaddleDetection,训练目标检测模型,同时考虑到算法真实落地的需求,介绍了基于TensorRT的模型加速流程,相比与官方给出的测试数据有较大的提升。本项目的相关技术实现适用于PPYOLOE系列算法的所有模型,希望通过此项目介绍能推动PPYOLOE这个高性能模型的应用。[本项目仅适用与 A100环境]
2. 数据集 Link
数据集详情如下
trafficlight/
├── code
│   ├── json_merge.py # 用于json合并
│   ├── json_split.py # 按一定比例将json分成两份
├── img_without_anno
│   ├── 45张没有标注信息的交通灯图片
├── JPEGImages
│   ├── 2226张没有标注信息的交通灯图片
├── train.json
├── eval.json
训练集:{‘4’: 1304, ‘5’: 108, ‘6’: 1744, ‘7’: 3174} 验证集:{‘4’: 312, ‘5’: 31, ‘6’: 469, ‘7’: 748} 其中4表示红灯,5表示黄灯,6表示绿灯,7表示未亮灯
In [1]# 解压数据集!unzip -oq /home/aistudio/data/data153372/trafficlight.zip -d /home/aistudio/data/data153372
可视化数据集
In [2]import jsonimport osimport randomimport matplotlib.pyplot as plt import cv2from PIL import ImageIn [3]
num_image = 20json_path = 'data/data153372/trafficlight/train.json'img_path = 'data/data153372/trafficlight/JPEGImages'with open(json_path) as annos:
annotation_json = json.load(annos)# 统计json文件的关键字长度print('the annotation_json num_key is:', len(annotation_json))# 读出json文件的关键字print('the annotation_json key is:', annotation_json.keys())# json文件中包含的图片数量print('the annotation_json num_images is:', len(annotation_json['images']))# 获取所有类别数categories = annotation_json['categories']
categories_dict = {c['id']: c['name '] for c in categories}
class_nums = len(categories_dict.keys())print('class name', categories_dict.keys())
color = [(random.randint(0, 255), random.randint(0, 255),
random.randint(0, 255)) for _ in range(class_nums)]# 读取图像image_name = annotation_json['images'][num_image - 1]['file_name']
img_id = annotation_json['images'][num_image - 1]['id']
image_path = os.path.join(img_path, str(image_name).zfill(5))
image = cv2.imread(image_path, 1)
annotations = annotation_json['annotations']
num_bbox = 0for anno in annotations: if anno['image_id'] == img_id:
num_bbox = num_bbox + 1
class_id = anno['category_id']
class_name = categories_dict[class_id]
class_color = random.choice(color) # 绘制边框
x, y, w, h = list(map(int, anno['bbox']))
cv2.rectangle(image, (int(x), int(y)),
(int(x + w), int(y + h)),
class_color, 2) # 绘制文本
font_size = 0.7
txt_size = cv2.getTextSize(class_name, cv2.FONT_HERSHEY_SIMPLEX,
font_size, 1)[0]
cv2.rectangle(image, (x, y + 1),
(x + txt_size[0] + 10, y - int(2 * txt_size[1])),
class_color, -1)
cv2.putText(image, class_name, (x + 5, y - 5),
cv2.FONT_HERSHEY_SIMPLEX,
font_size, (255, 255, 255), 1)print('The unm_bbox of the display image is:', num_bbox)# 保存可视化图即可
'] for c in categories}
class_nums = len(categories_dict.keys())print('class name', categories_dict.keys())
color = [(random.randint(0, 255), random.randint(0, 255),
random.randint(0, 255)) for _ in range(class_nums)]# 读取图像image_name = annotation_json['images'][num_image - 1]['file_name']
img_id = annotation_json['images'][num_image - 1]['id']
image_path = os.path.join(img_path, str(image_name).zfill(5))
image = cv2.imread(image_path, 1)
annotations = annotation_json['annotations']
num_bbox = 0for anno in annotations: if anno['image_id'] == img_id:
num_bbox = num_bbox + 1
class_id = anno['category_id']
class_name = categories_dict[class_id]
class_color = random.choice(color) # 绘制边框
x, y, w, h = list(map(int, anno['bbox']))
cv2.rectangle(image, (int(x), int(y)),
(int(x + w), int(y + h)),
class_color, 2) # 绘制文本
font_size = 0.7
txt_size = cv2.getTextSize(class_name, cv2.FONT_HERSHEY_SIMPLEX,
font_size, 1)[0]
cv2.rectangle(image, (x, y + 1),
(x + txt_size[0] + 10, y - int(2 * txt_size[1])),
class_color, -1)
cv2.putText(image, class_name, (x + 5, y - 5),
cv2.FONT_HERSHEY_SIMPLEX,
font_size, (255, 255, 255), 1)print('The unm_bbox of the display image is:', num_bbox)# 保存可视化图即可
 '] for c in categories}
class_nums = len(categories_dict.keys())print('class name', categories_dict.keys())
color = [(random.randint(0, 255), random.randint(0, 255),
random.randint(0, 255)) for _ in range(class_nums)]# 读取图像image_name = annotation_json['images'][num_image - 1]['file_name']
img_id = annotation_json['images'][num_image - 1]['id']
image_path = os.path.join(img_path, str(image_name).zfill(5))
image = cv2.imread(image_path, 1)
annotations = annotation_json['annotations']
num_bbox = 0for anno in annotations: if anno['image_id'] == img_id:
num_bbox = num_bbox + 1
class_id = anno['category_id']
class_name = categories_dict[class_id]
class_color = random.choice(color) # 绘制边框
x, y, w, h = list(map(int, anno['bbox']))
cv2.rectangle(image, (int(x), int(y)),
(int(x + w), int(y + h)),
class_color, 2) # 绘制文本
font_size = 0.7
txt_size = cv2.getTextSize(class_name, cv2.FONT_HERSHEY_SIMPLEX,
font_size, 1)[0]
cv2.rectangle(image, (x, y + 1),
(x + txt_size[0] + 10, y - int(2 * txt_size[1])),
class_color, -1)
cv2.putText(image, class_name, (x + 5, y - 5),
cv2.FONT_HERSHEY_SIMPLEX,
font_size, (255, 255, 255), 1)print('The unm_bbox of the display image is:', num_bbox)# 保存可视化图即可
'] for c in categories}
class_nums = len(categories_dict.keys())print('class name', categories_dict.keys())
color = [(random.randint(0, 255), random.randint(0, 255),
random.randint(0, 255)) for _ in range(class_nums)]# 读取图像image_name = annotation_json['images'][num_image - 1]['file_name']
img_id = annotation_json['images'][num_image - 1]['id']
image_path = os.path.join(img_path, str(image_name).zfill(5))
image = cv2.imread(image_path, 1)
annotations = annotation_json['annotations']
num_bbox = 0for anno in annotations: if anno['image_id'] == img_id:
num_bbox = num_bbox + 1
class_id = anno['category_id']
class_name = categories_dict[class_id]
class_color = random.choice(color) # 绘制边框
x, y, w, h = list(map(int, anno['bbox']))
cv2.rectangle(image, (int(x), int(y)),
(int(x + w), int(y + h)),
class_color, 2) # 绘制文本
font_size = 0.7
txt_size = cv2.getTextSize(class_name, cv2.FONT_HERSHEY_SIMPLEX,
font_size, 1)[0]
cv2.rectangle(image, (x, y + 1),
(x + txt_size[0] + 10, y - int(2 * txt_size[1])),
class_color, -1)
cv2.putText(image, class_name, (x + 5, y - 5),
cv2.FONT_HERSHEY_SIMPLEX,
font_size, (255, 255, 255), 1)print('The unm_bbox of the display image is:', num_bbox)# 保存可视化图即可the annotation_json num_key is: 3 the annotation_json key is: dict_keys(['images', 'annotations', 'categories']) the annotation_json num_images is: 1781 class name dict_keys([4, 5, 6, 7]) The unm_bbox of the display image is: 3In [4]
Image.fromarray(image[:, :, ::-1])
<PIL.Image.Image image mode=RGB size=1920x1080 at 0x7F4B4457AC50>
3.构建训练环境
PaddleDetection 简介

 简介
简介
PaddleDetection为基于飞桨PaddlePaddle的端到端目标检测套件,内置30+模型算法及250+预训练模型,覆盖目标检测、实例分割、跟踪、关键点检测等方向,其中包括服务器端和移动端高精度、轻量级产业级SOTA模型、冠军方案和学术前沿算法,并提供配置化的网络模块组件、十余种数据增强策略和损失函数等高阶优化支持和多种部署方案,在打通数据处理、模型开发、训练、压缩、部署全流程的基础上,提供丰富的案例及教程,加速算法产业落地应用。
提供目标检测、实例分割、多目标跟踪、关键点检测等多种能力
应用场景覆盖工业、智慧城市、安防、交通、零售、医疗等十余种行业

 特性
特性
- 模型丰富: 包含目标检测、实例分割、人脸检测、关键点检测、多目标跟踪等250+个预训练模型,涵盖多种全球竞赛冠军方案。
- 使用简洁:模块化设计,解耦各个网络组件,开发者轻松搭建、试用各种检测模型及优化策略,快速得到高性能、定制化的算法。
- 端到端打通: 从数据增强、组网、训练、压缩、部署端到端打通,并完备支持云端/边缘端多架构、多设备部署。
- 高性能: 基于飞桨的高性能内核,模型训练速度及显存占用优势明显。支持FP16训练, 支持多机训练。
# 拉取代码!git clone https://gitee.com/paddlepaddle/PaddleDetection.git
fatal: 目标路径 'PaddleDetection' 已经存在,并且不是一个空目录。In [ ]
### 配置PaddleDetectionabs!rm -rf PaddleDetection/configs/
!cp -r configs/ PaddleDetection
%cd PaddleDetection
!pip install -r requirements.txt
!python setup.py install
3.模型选择与训练
挂载数据集
In [7]!ln -s ~/data/data153372/trafficlight dataset/trafficlight
模型方面,采用了PPYOLOE M 模型作为检测器
首先PP-YOLOE-l 在COCO数据集上达到了51.4mAP。相比较PP-YOLOv2提升1.9AP和13.35%的速度,相比较YOLOX提升1.3AP和24.96%的速度。
主要的改进点是:
- anchor-free,
- powerful backbone and neck,
- TAL动态label assign,
- ET-head。

算法配置
超参数配置文件ppyoloe_trafficlight.yml
_BASE_: [  '../datasets/traffic.yml',  '../runtime.yml',  './_base_/optimizer_300e.yml',  './_base_/ppyoloe_crn.yml',  './_base_/ppyoloe_reader.yml',
]log_iter: 100snapshot_epoch: 10epoch: 300weights: output/ppyoloe_trafficlight/model_finalfind_unused_parameters: Truepretrain_weights: https://paddledet.bj.bcebos.com/models/ppyoloe_crn_m_300e_coco.pdparamsdepth_mult: 0.67width_mult: 0.75TrainReader:
  batch_size: 16LearningRate:
  base_lr: 0.0001
  schedulers:
    - !CosineDecay
      max_epochs: 360
    - !LinearWarmup
      start_factor: 0.00001
      steps: 2300
数据集traffic.yml
 Motiff妙多
Motiff妙多是一款AI驱动的界面设计工具,定位为“AI时代设计工具”
 334
查看详情
334
查看详情

metric: COCOnum_classes: 4TrainDataset:
 !COCODataSet
   image_dir: JPEGImages
   anno_path: train.json
   dataset_dir: dataset/trafficlight
   data_fields: ['image', 'gt_bbox', 'gt_class', 'is_crowd']EvalDataset:
 !COCODataSet
   image_dir: JPEGImages
   anno_path: eval.json
   dataset_dir: dataset/trafficlightTestDataset:
 !ImageFolder
   anno_path: eval.json # also support txt (like VOC's label_list.txt)
   dataset_dir: dataset/trafficlight # if set, anno_path will be 'dataset_dir/anno_path'
In [ ]
# 训练模型,采用VD可视化 混合精度训练!python -m paddle.distributed.launch --gpus 0 tools/train.py -c configs/ppyoloe/ppyoloe_trafficlight.yml --eval --use_vd True --amp
4.模型验证
Average Precision  (AP) @[ IoU=0.50:0.95 | area=   all | maxDets=100 ] = 0.356
 Average Precision  (AP) @[ IoU=0.50      | area=   all | maxDets=100 ] = 0.594
 Average Precision  (AP) @[ IoU=0.75      | area=   all | maxDets=100 ] = 0.380
 Average Precision  (AP) @[ IoU=0.50:0.95 | area= small | maxDets=100 ] = 0.261
 Average Precision  (AP) @[ IoU=0.50:0.95 | area=medium | maxDets=100 ] = 0.571
 Average Precision  (AP) @[ IoU=0.50:0.95 | area= large | maxDets=100 ] = 0.438
 Average Recall     (AR) @[ IoU=0.50:0.95 | area=   all | maxDets=  1 ] = 0.263
 Average Recall     (AR) @[ IoU=0.50:0.95 | area=   all | maxDets= 10 ] = 0.503
 Average Recall     (AR) @[ IoU=0.50:0.95 | area=   all | maxDets=100 ] = 0.509
 Average Recall     (AR) @[ IoU=0.50:0.95 | area= small | maxDets=100 ] = 0.432
 Average Recall     (AR) @[ IoU=0.50:0.95 | area=medium | maxDets=100 ] = 0.695
 Average Recall     (AR) @[ IoU=0.50:0.95 | area= large | maxDets=100 ] = 0.526
5.模型导出及TRT加速
在检测模型中后处理需要用到NMS算法,在项目使用TensorRT加速YOLOv6-Python笔者介绍了如何使用TRT加速一个检测模型,在该项目中,导出ONNX模型时并没有包含NMS(paddledetection导出包含NMS的ONNX模型无法转换到TRT序列化模型),因此NMS 的实现需要得到结果后再进行一次后处理,这样导致模型的推理速度较慢(相比于接下来介绍的端到端加速方案)。接下来我们将介绍如何将NMS封装到模型内部,实现端到端的模型加速。
In [ ]# 导出模型、onnx模型!pip install onnxruntime onnx paddle2onnx
!python tools/export_model.py -c configs/ppyoloe/ppyoloe_trafficlight.yml --output_dir=inference_model -o weights=output/ppyoloe_trafficlight/best_model.pdparams trt=True exclude_nms=True estReader.inputs_def.image_shape=[3,640,640]
!paddle2onnx --model_dir inference_model/ppyoloe_trafficlight/ --model_filename model.pdmodel --params_filename model.pdiparams --opset_version 13 --s*e_file ppyoloe.onnx --input_shape_dict "{'image':[1, 3, 640, 640], 'scale_factor': [1, 2]}"
NMS注册依赖
In [ ]!python3 -m pip install --upgrade setuptools pip --user !pip install -U numpy !pip install -U onnx !python3 -m pip install nvidia-pyindex !python3 -m pip install --upgrade nvidia-tensorrt !pip install pycuda !pip install onnx_graphsurgeon !pip install onnx-simplifier
使用Netron检查得到的ONNX模型,得到节点信息。
节点Mul_100,Concat_14对应模型的目标框和置信度,如下图,通过onnx_graphsurgeon将TRT支持的NMS插件注册到模型中
原始ONNX模型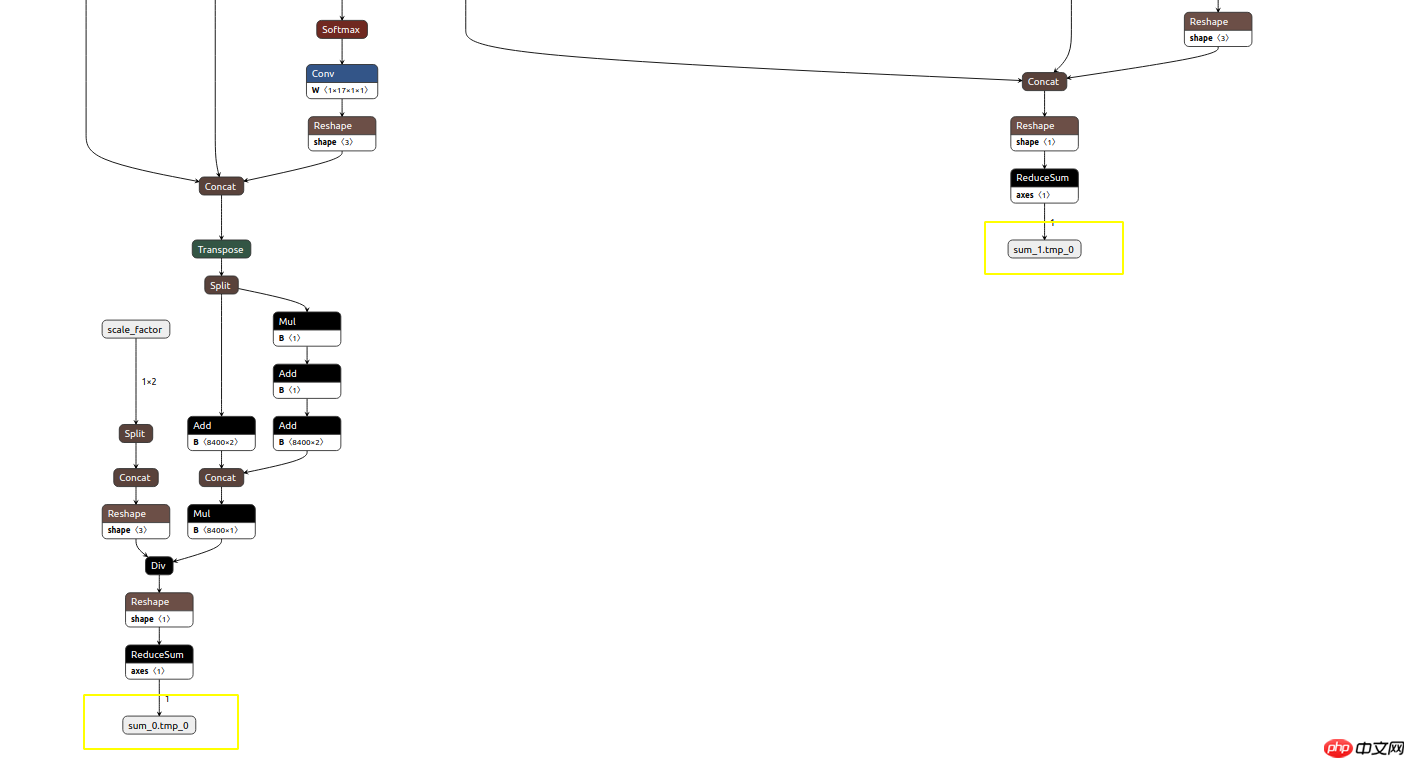
注册NMS模型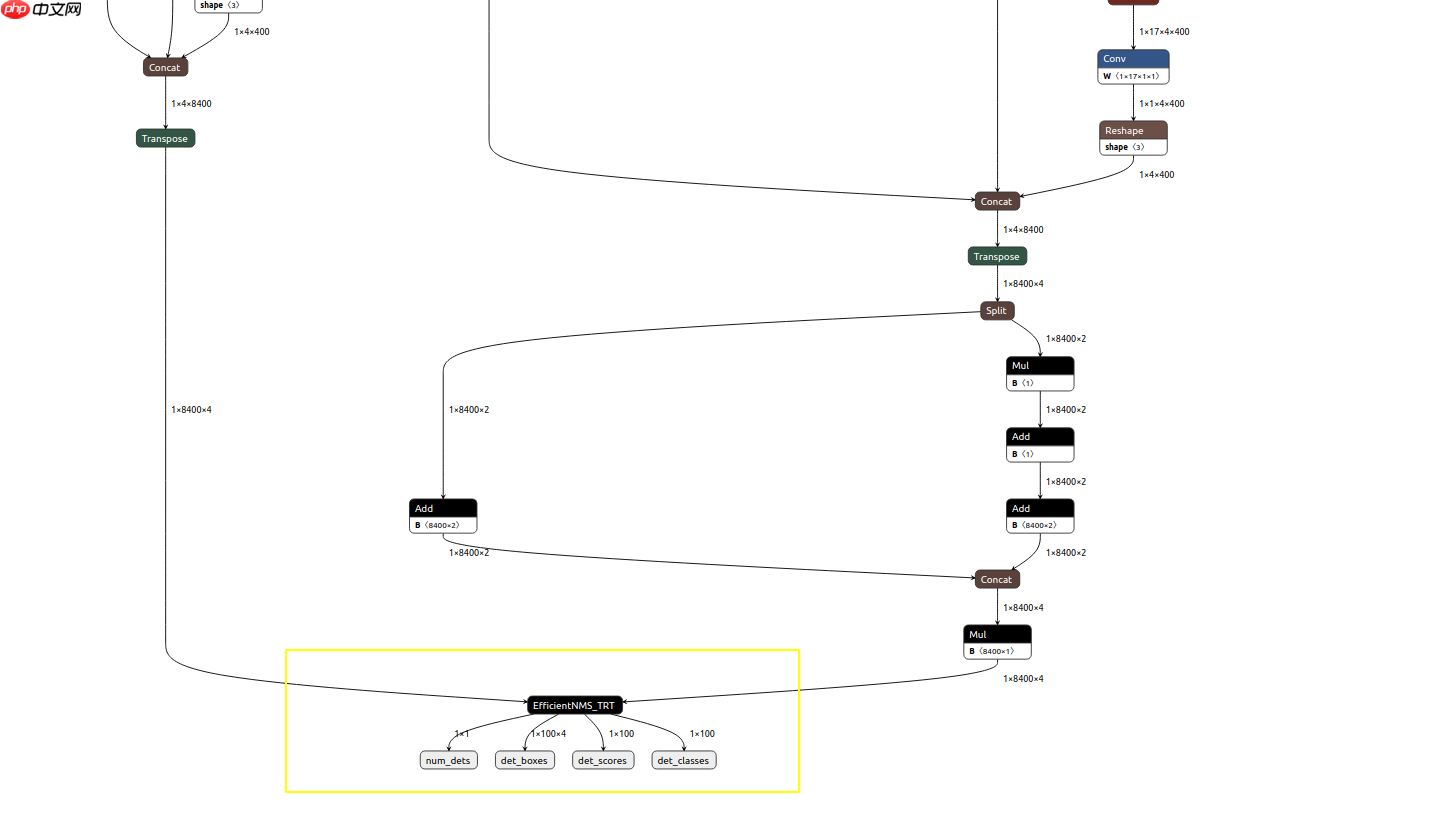
%cd /home/aistudio/
/home/aistudioIn [13]
import onnximport onnx_graphsurgeon as gsimport numpy as npfrom onnx import shape_inferencefrom collections import OrderedDictimport onnxsimIn [14]
## 注册NMSw = './PaddleDetection/ppyoloe.onnx'gs_graph = gs.import_onnx(onnx.load(w))# fold constantsgs_graph.fold_constants()
gs_graph.cleanup().toposort()

Mul_100 = [node for node in gs_graph.nodes if node.name=='Mul_100'][0]
Concat_14 = [node for node in gs_graph.nodes if node.name=='Concat_14'][0]

scores = gs.Variable(name='scores',shape=[1,8400,4],dtype=np.float32)
Transpose = gs.Node(name='lastTranspose',op='Transpose',
                   inputs=[Concat_14.outputs[0]],
                   outputs=[scores],
                   attrs=OrderedDict(perm=[0,2,1]))
gs_graph.nodes.append(Transpose)

Mul_100.outputs[0].name = 'boxes'gs_graph.inputs = [gs_graph.inputs[0]]
gs_graph.outputs = [Mul_100.outputs[0],scores]
gs_graph.outputs[0].dtype=np.float32
gs_graph.outputs[1].dtype=np.float32

gs_graph.cleanup().toposort()
onnx_graph = shape_inference.infer_shapes(gs.export_onnx(gs_graph))
onnx_graph, check = onnxsim.simplify(onnx_graph)

gs_graph = gs.import_onnx(onnx_graph)
op_inputs = gs_graph.outputs
op = "EfficientNMS_TRT"attrs = {    "plugin_version": "1",    "background_class": -1,    "max_output_boxes": 100,    "score_threshold": 0.25,    "iou_threshold": 0.45,    "score_activation": False,    "box_coding": 0,
}

output_num_detections = gs.Variable(
    name="num_dets",
    dtype=np.int32,
    shape=[1, 1],
)
output_boxes = gs.Variable(
    name="det_boxes",
    dtype=np.float32,
    shape=[1, 100, 4],
)
output_scores = gs.Variable(
    name="det_scores",
    dtype=np.float32,
    shape=[1, 100],
)
output_labels = gs.Variable(
    name="det_classes",
    dtype=np.int32,
    shape=[1, 100],
)
op_outputs = [
    output_num_detections, output_boxes, output_scores, output_labels
]

TRT = gs.Node(op=op,name="batched_nms",inputs=op_inputs,outputs=op_outputs,attrs=attrs)
gs_graph.nodes.append(TRT)
gs_graph.outputs = op_outputs
gs_graph.cleanup().toposort()

onnx.s*e(gs.export_onnx(gs_graph),'./ppyoloe_nms.onnx')print('Add NMS')
Add NMSIn [16]
import tensorrtprint(tensorrt.__version__)assert tensorrt.Builder(tensorrt.Logger())
8.4.1.5
导出TRT 序列化模型
In [ ]!python export.py -o ppyoloe_nms.onnx -e ppyoloe_nms_fp16.trt -p fp16In [18]
import numpy as npimport cv2import timeimport osimport tensorrt as trtimport pycuda.autoinitimport pycuda.driver as cuda
trt.init_libnvinfer_plugins(None,'') # 使用NMS 插件
TrueIn [19]
class BaseEngine(object):
    def __init__(self, engine_path):
        logger = trt.Logger(trt.Logger.WARNING)
        runtime = trt.Runtime(logger)        with open(engine_path, "rb") as f:
            serialized_engine = f.read()
        engine = runtime.deserialize_cuda_engine(serialized_engine)
        self.context = engine.create_execution_context()
        self.inputs, self.outputs, self.bindings = [], [], []
        self.stream = cuda.Stream()        for binding in engine:
            size = trt.volume(engine.get_binding_shape(binding))
            dtype = trt.nptype(engine.get_binding_dtype(binding))
            host_mem = cuda.pagelocked_empty(size, dtype)
            device_mem = cuda.mem_alloc(host_mem.nbytes)
            self.bindings.append(int(device_mem))            if engine.binding_is_input(binding):
                self.inputs.append({'host': host_mem, 'device': device_mem})            else:
                self.outputs.append({'host': host_mem, 'device': device_mem})    def infer(self, img):
        self.inputs[0]['host'] = np.r*el(img)        # transfer data to the gpu
        for inp in self.inputs:
            cuda.memcpy_htod_async(inp['device'], inp['host'], self.stream)        # run inference
        self.context.execute_async_v2(
            bindings=self.bindings,
            stream_handle=self.stream.handle)        # fetch outputs from gpu
        for out in self.outputs:
            cuda.memcpy_dtoh_async(out['host'], out['device'], self.stream)        # synchronize stream
        self.stream.synchronize()

        data = [out['host'] for out in self.outputs]        return datadef preproc(image, input_size, mean, std, swap=(2, 0, 1)):
    if len(image.shape) == 3:
        padded_img = np.ones((input_size[0], input_size[1], 3)) * 114.0
    else:
        padded_img = np.ones(input_size) * 114.0
    img = np.array(image)
    r = min(input_size[0] / img.shape[0], input_size[1] / img.shape[1])
    resized_img = cv2.resize(
        img,
        (int(img.shape[1] * r), int(img.shape[0] * r)),
        interpolation=cv2.INTER_LINEAR,
    ).astype(np.float32)
    padded_img[: int(img.shape[0] * r), : int(img.shape[1] * r)] = resized_img

    padded_img = padded_img[:, :, ::-1]
    padded_img /= 255.0
    if mean is not None:
        padded_img -= mean    if std is not None:
        padded_img /= std
    padded_img = padded_img.transpose(swap)
    padded_img = np.ascontiguousarray(padded_img, dtype=np.float32)    return padded_img, r


_COLORS = np.array(
    [        0.000, 0.447, 0.741,        0.850, 0.325, 0.098,        0.929, 0.694, 0.125,        0.494, 0.184, 0.556,        0.466, 0.674, 0.188
    ]
).astype(np.float32).reshape(-1, 3)def vis(img, boxes, scores, cls_ids, conf=0.5, class_names=None):
    for i in range(len(boxes)):
        box = boxes[i]
        cls_id = int(cls_ids[i])
        score = scores[i]        if score < conf:            continue
        x0 = int(box[0])
        y0 = int(box[1])
        x1 = int(box[2])
        y1 = int(box[3])

        color = (_COLORS[cls_id] * 255).astype(np.uint8).tolist()
        text = '{}:{:.1f}%'.format(class_names[cls_id], score * 100)
        txt_color = (0, 0, 0) if np.mean(_COLORS[cls_id]) > 0.5 else (255, 255, 255)
        font = cv2.FONT_HERSHEY_SIMPLEX

        txt_size = cv2.getTextSize(text, font, 0.4, 1)[0]
        cv2.rectangle(img, (x0, y0), (x1, y1), color, 2)

        txt_bk_color = (_COLORS[cls_id] * 255 * 0.7).astype(np.uint8).tolist()
        cv2.rectangle(
            img,
            (x0, y0 + 1),
            (x0 + txt_size[0] + 1, y0 + int(1.5 * txt_size[1])),
            txt_bk_color,
            -1
        )
        cv2.putText(img, text, (x0, y0 + txt_size[1]), font, 0.4, txt_color, thickness=1)    return img
In [20]
class Predictor(BaseEngine):
    def __init__(self, engine_path , imgsz=(640,640)):
        super(Predictor, self).__init__(engine_path)
        self.imgsz = imgsz
        self.class_names = [ 'Traffic Light-Red Light',                            'Traffic Light-Yellow Light',                            'Traffic Light-Green Light',                            'Traffic Light-Off']    def inference(self, img_path):
        origin_img = cv2.imread(img_path)
        mean = (0.485, 0.456, 0.406)
        std = (0.229, 0.224, 0.225)
        img, ratio = preproc(origin_img, self.imgsz, mean, std)
        num, final_boxes, final_scores, final_cls_inds = self.infer(img)
        final_boxes = np.reshape(final_boxes, (-1, 4))
        num = num[0]        if num >0:
            final_boxes, final_scores, final_cls_inds = final_boxes[:num]/ratio, final_scores[:num], final_cls_inds[:num]
            origin_img = vis(origin_img, final_boxes, final_scores, final_cls_inds,
                             conf=0.3, class_names=self.class_names)

        cv2.imwrite("%s_ppyoloe.jpg" % os.path.splitext(
            os.path.split(img_path)[-1])[0], origin_img)
    def get_fps(self):
        # warmup
        img = np.ones((1,3,640,640))
        img = np.ascontiguousarray(img, dtype=np.float32)        for _ in range(20):
            _ = self.infer(img)
        t1 = time.perf_counter()
        _ = self.infer(img)        print(1/(time.perf_counter() - t1), 'FPS')
In [22]
pred = Predictor(engine_path='ppyoloe_nms.trt')
pred.get_fps()
[07/07/2025-11:27:45] [TRT] [W] TensorRT was linked against cuDNN 8.4.1 but loaded cuDNN 8.2.0
[07/07/2025-11:27:45] [TRT] [W] TensorRT was linked against cuDNN 8.4.1 but loaded cuDNN 8.2.0
199.98711579598273 FPS
In [27]
pred.inference('data/data153372/trafficlight/img_without_anno/08015.jpg')

结果展示
6.结果测试
YOLOE-M End2End
| Device | FP32 | FP16 | int8 |
|---|---|---|---|
| A100 | 224FPS | 330FPS | - |
| 1080Ti | 101FPS | 103FPS | 171FPS |
Origin
| 模型 | GPU个数 | 每GPU图片个数 | 骨干网络 | 输入尺寸 | Box APval 0.5:0.95 |
Box APtest 0.5:0.95 |
Params(M) | FLOPs(G) | V100 FP32(FPS) | V100 TensorRT FP16(FPS) | 模型下载 | 配置文件 |
|---|---|---|---|---|---|---|---|---|---|---|---|---|
| PP-YOLOE-s | 8 | 32 | cspresnet-s | 640 | 43.0 | 43.2 | 7.93 | 17.36 | 208.3 | 333.3 | model | config |
| PP-YOLOE-m | 8 | 28 | cspresnet-m | 640 | 49.0 | 49.1 | 23.43 | 49.91 | 123.4 | 208.3 | model | config |
| PP-YOLOE-l | 8 | 20 | cspresnet-l | 640 | 51.4 | 51.6 | 52.20 | 110.07 | 78.1 | 149.2 | model | config |
| PP-YOLOE-x | 8 | 16 | cspresnet-x | 640 | 52.3 | 52.4 | 98.42 | 206.59 | 45.0 | 95.2 | model | config |
可以发现使用端到端的加速策略,模型的推理速度有较大的提升在V100上模型FP32的推理速度远高于官方版本给出的baseline
以上就是【AI达人特训营】在智能交通场景中端到端加速PPYOLOE的详细内容,更多请关注其它相关文章!
# 智能交通
# 资阳定制网站建设公司
# 怎么做手机卡充值网站推广
# 电源网站如何推广
# 网站app建设上海
# 营销推广经理
# 网站建设信息推广方案模板
# 木棉网络营销推广
# 廊坊网站建设有哪些方法
# 满洲里短视频推广营销
# seo优化案例介绍
# 适用于
# 套件
# 一言
# 高性能
# 交通灯
# python
# 景中
# 达人
# 中文网
# 端到
# fig
# onu
# 飞桨paddlepaddle
# udio
# igs
# red
# cos
# 可视化数据
# ai
# git
相关栏目:
【
行业资讯67740 】
【
技术百科0 】
【
网络运营39195 】
相关推荐:
typescript为什么现在才火
如何将系统移到固态硬盘
typescript有什么框架
python和typescript学哪个
win10如何开启命令行
sofa是什么意思
如何加装固态硬盘
sqlite中datediff函数怎么用 SQLite中DATEDIFF()函数的用法分享
光刻机的分类及特点
夸克链信有什么用
put linux命令如何书写
vivo手机nfc功能是什么意思
linux如何使用db2命令
春运抢票哪个平台好一点
分享一个稳定的ao3镜像网址
市盈率估值1stdv是什么意思
如何更新苹果ios16
如何知道固态硬盘
喇叭上标的power30w是什么意思
j*a怎么讲数组打印
复制 命令如何撤销
shell如何执行sql脚本命令行
固态硬盘如何消除缓存
市盈率回落是什么意思
台达变频器power灯是什么意思
苹果16有哪些可以设置
如何发挥固态硬盘性能
考勤机power红灯是什么意思
夸克po什么意思
春运抢票何时开始抢票的
5g手机4g卡怎么没有网络
如何为服务器配置静态路由?服务器配置静态路由详细教程
固态硬盘如何打开软件
推特是什么软件国内可以使用吗
春运抢票到哪里抢票啊
如何区别固态硬盘
win10电脑如何使用命令提示符
春运抢票多久能知道成功
debian和ubuntu命令一样吗
命令行如何启动应用程序
微信最多可以加多少好友
为什么都做折叠屏手机呢
春运车票啥时候可以抢票
typescript怎么写游戏
固态硬盘如何4k对其
苹果16有哪些bug
单片机怎么控制内功率
台机如何安装固态硬盘
怎么在项目中使用typescript
直接gmV是什么意思?直接GMV:定义和概念
